


How to set up a Playnite game library on a GPD handheld, how to import local games, and how to download demo versions of games?
Handheld gamers are well aware that the GPD handheld, when running Playnite, serves as a game library consolidator, seamlessly integrating titles from various platforms such as Steam, Epic Games Store, Rockstar Games Launcher, and more, into a single client for effortless management across platforms without the need to constantly switch between different launchers.

However, many players are unsure of how to configure their Playnite library effectively, to link and efficiently manage all these gaming platforms. Today, we're diving into a tutorial to address just that!
Installing Playnite
First, download Playnite, which is very lightweight, coming in at just a 250KB installer file. Simply double-click to begin the installation process; some components will be downloaded online during this time. Follow the prompts provided to complete the installation.
Upon finishing the installation, you'll be directed to the configuration interface!

Choose the gaming platforms you want to consolidate.

Proceed with some configurations.

Click "Finish" to complete the setup.

By default, Playnite is in English. Click the little "controller" icon in the top left corner, navigate to "Settings" to adjust the language to other languages.

Adding Games:
The process of importing local games into Playnite is straightforward. Click the "controller" icon in the top left corner, select "Add Games," and then choose "Auto-Detect.


After the addition is complete, Playnite will fetch data from IGDB and display the game information.

Editing Game Information:
Occasionally, data may not be fetched or may be incomplete. In such cases, you have the option to edit the game's details. Select the game, right-click it, and choose "Edit" to access the game details editing interface!


Of course, such scripts are often unnecessary, but they can be incredibly useful when, for instance, you need to run a game modifier or trainer before or after launching a game, making scripting a convenient tool for these purposes.
What are the advantages of Playnite?
Playnite excels in integrating third-party platforms, though this doesn't mean those platforms themselves don't need to be installed. When using Playnite, the third-party platforms still have to be launched for certain operations. However, games already downloaded locally can be launched directly without needing to open their respective platforms. Consequently, if you're an avid gamer with a diverse library, Playnite is an optimal choice for managing your collection conveniently in one place.
Here are some links for gaming resources:
Switch520: This is a comprehensive website featuring Switch games, PC games, PS4, PS5 titles, and other emulator games!
Link:https://www.gamer520.com/
Flysheep Resource Refuge: Not only does it offer a multitude of PC games, but it also provides a variety of emulator games.

Link:https://www.flysheep6.com/
ROMS.FUN:A comprehensive gaming forum platform offering PC games and emulator games!

Link:https://www.roms.fun/
Old Man Gamer Network: Primarily focusing on handheld console emulator games and console emulator games, it boasts an exceedingly rich resource collection.

STEAMUNLOCKED: An overseas game download site that supplies downloads for various mainstream games.

Link:https://steamunlocked.net/
3DM: Needing no further introduction, this platform is well-known among Chinese gamers.

How to link third-party platforms with Playnite?
Considering many users purchase games on various third-party platforms, integrating multiple platforms with Playnite becomes the optimal solution. Below, using Steam as an example, we'll outline how to associate a third-party platform.
First, install the Steam client, though logging in is not necessary at this step. Afterwards, click on the "controller" icon in the top left corner of Playnite, and select "Add-ons."

Click on "Library," and in the right column, select Steam, then choose "Save."

Click the icon in the top left corner, and opt for "Library" -- "Configure Integrations."

Tick the box for "Connect Account," and then click on "Authenticate."

In the popup window, enter your username and password to log in to Steam; naturally, a verification code will be sent to your email.

Input the verification code, and after successfully logging in, the authentication process will indicate that this is a private account, requiring an API key. Tick the box for "Private Account," and then click on "Get API Key."

Input the verification code, and after successfully logging in, the authentication process will indicate that this is a private account, requiring an API key. Tick the box for "Private Account," and then click on "Get API Key."

To install the Steam Guard Mobile Authenticator, you'll need to download the mobile version of the Steam client. Steam's official website provides detailed installation and setup instructions, which won't be elaborated on here:
https://help.steampowered.com/zh-cn/faqs/view/6891-E071-C9D9-0134
For the Steam mobile app (available for both Android and iOS), you can visit the following link:
https://store.steampowered.com/mobile#mobile_section

Successfully accessing the registration interface, you may fill in any domain name as desired.

Then, confirm via your mobile device.

Input the API key.

Back out to the configuration page, check the box for "Import Uninstalled Games," and exit.

Next, click the top-left "controller" icon, select "Update Game Library" -- "Steam."

You will now see the games you've purchased on Steam successfully imported into Playnite.

How to Configure Emulators for Games on Playnite
Firstly, it's important to note that Playnite itself doesn't run emulator games; you'll also need to download and install the emulators separately.
To begin, click on the "Gamepad" icon in the top left corner, then select "Library" --> "Configure Emulators".

On the emulator configuration page, select "Download Emulator" at the bottom right corner.

In this demonstration, we'll show downloading a Nintendo Switch emulator. Click the link provided to navigate to the web page for the download. The process of downloading and installing the emulator won't be detailed here.

After installing the emulator, return to the Playnite emulator configuration screen and click "Import".

Scan the folders, and when the path to the installed emulator is detected, it will be automatically added. Click "Import," followed by "Save," to complete the process.

To add emulator games in Playnite:
Start by clicking the "Gamepad" icon in the top left corner again, then choose "Add Game" --> "Emulated Game.

Click on "Add Scanner."

Refer to the following settings and then click "Start Scan."

Click "Import."

Once the game is successfully added, click "Play" to launch it.

You should now be able to normally access and play the emulator game.

Data Source Addition
A data source refers to third-party compiled information on game data, which is retrieved and organized. To proceed, click on the "Controller" icon, then select "Add-ons," and subsequently, click on "Data Sources."

Upon clicking "Data Sources," choose your preferred data source from the options on the right.

Here's a breakdown of the correlation between games and their respective data sources:
PC Games: Metadata Local, PCGaming Wiki
Emulators: IGDB (for Switch), PSN (for PlayStation), Gametdb (for Wii and GameCube)
GalGames: Metadata Local, DLsite, VNDB
Install the desired data sources by clicking on them (you can install multiple sources) and save the settings. Note that each adjustment requires restarting the application.

Post-restart, navigate back to "Add-ons" to confirm successful installation.

Metadata Local encompasses 6 game data sources. You have the option to modify these, though the default settings usually suffice.

Next, head to "Settings."

Select "Game Data."

You may opt to adjust the "Game Data" source if needed, although this is typically unnecessary.

Following the previous tutorial, manually add a game by inputting its title in the designated field.

In the "Game Title" field, enter the game name.

Subsequently, click on "Download Game Data" in the bottom left corner to automatically fetch corresponding game information.

Media Tab: Primarily for adding icons and cover images.

Click the "+" icon to initiate the addition process.
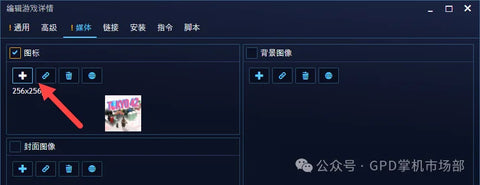
The system will automatically search for images; landscapes are suited for backgrounds, while portraits work best for covers.

Once you've selected an image, click "Choose" to download it.

This is how it looks after adding the images.

Under the Installation Tab, designate the directory where the game is located.

In the Command Tab, input the launch command for the game.

Effectively, this involves specifying the path to the game's executable (.exe) file. Additional parameters are generally unnecessary. Save the configuration upon completion.

The final display should resemble the image provided.

By clicking "Play," you can launch the game directly.


![[US EU Warehouse]AOOSTAR MACO Mini PC AMD Ryzen 7 8845HS](http://minixpc.com/cdn/shop/files/a39f7f40547b0dc7d5f2db0d84605eec_900x.jpg?v=1784282176)
![[US EU Warehouse]AOOSTAR MACO Mini PC AMD Ryzen 7 8845HS](http://minixpc.com/cdn/shop/files/f060198d56d25e24f57a39defd55a25c_900x.jpg?v=1784282176)


